Getting Started to Set Up GitHub Pages for Portfolio
Welcome to my first step in creating the online portfolio using GitHub Pages. In this post, I will share with you how to set up a professional website to showcase our work and skills.
- What is GitHub Pages and Why Use It?
- Create a GitHub account
- Make a new repository
- Add Content and Make Your First Commit
- Conclusion and Next Steps
By the end, we would have the basic structure for a portfolio website.
Let’s begin.

What is GitHub Pages and Why Use It?
GitHub Pages is a free service that turns GitHub repositories into websites. It’s an excellent tool for creating a portfolio website because:
-
 It’s Free: There is no need to pay for hosting.
 -
 It’s Simple: If you can use GitHub, you can use GitHub Pages.
 -
 It Has Version Control: easily track changes to the website.
 -
 It Works Well with Jekyll: create a dynamic-looking site without managing a database.
 -
 It Connects to My Code: easily link to my other GitHub projects.
By using GitHub Pages, I created a portfolio that effectively presents my work to potential employers or clients.
Create a GitHub account
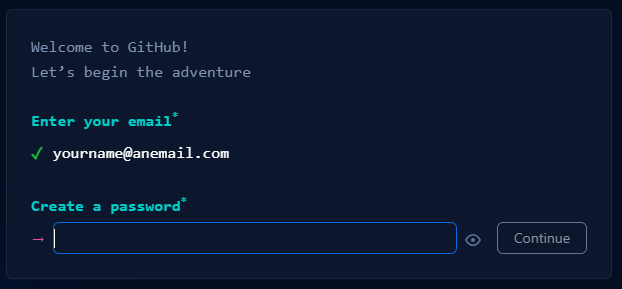
Before using GitHub Pages, we need to have a GitHub account. If you already have one, go ahead to make a new repository. If not, follow these steps to create an account:
-
Go to GitHub website.
-
Click Sign Up and enter your email address to continue.

-
Create a strong password for your account.
-
Choose a username for your GitHub account.
 Tips: This will be visible to others and will be part of your GitHub Pages URL, so choose wisely.
 -
Follow the prompts to verify your account.
-
For Choose a plan, the free plan is good enough for creating a portfolio with GitHub Pages. Select Free Plan.
-
Follow the prompts to customize or skip it for now.
-
Check your email inbox for a verification message from GitHub. Follow the prompts to verify your account.
-
For added security, set up two-factor authentication.
Now that you have a GitHub account, you’re ready to create a repository for your portfolio website. In the next section, I’ll cover how to do this and start setting up GitHub Pages.
Make a new repository
With a GitHub account, the next step is to create a new repository for the portfolio website. This repository will hold all the files for the site.
-
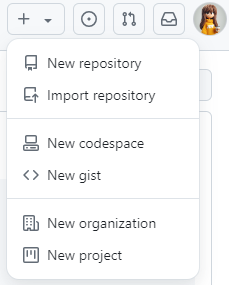
Log in to GitHub.
-
Click the + icon in the top right corner of the page. Select New repository from the dropdown menu to create a new repository.
-
Name the repository in this format: username.github.io, where username is the GitHub username.
For example, if your username is analystjoey, your repository should be named analystjoey.github.io.

-
Choose Public.

-
Check Add a README file to initialize the repository with a README.md file.

-
Click the Create repository button at the bottom of the page.

-
You’ll be taken to your new repository’s page. You should see a README.md file listed.

-
Enable GitHub Pages
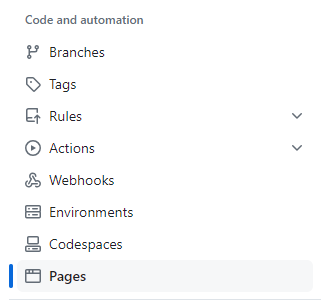
- Go to the Settings tab of your repository.

- Click on Pages on the left.
- Under Build and deployment, click None and select main.
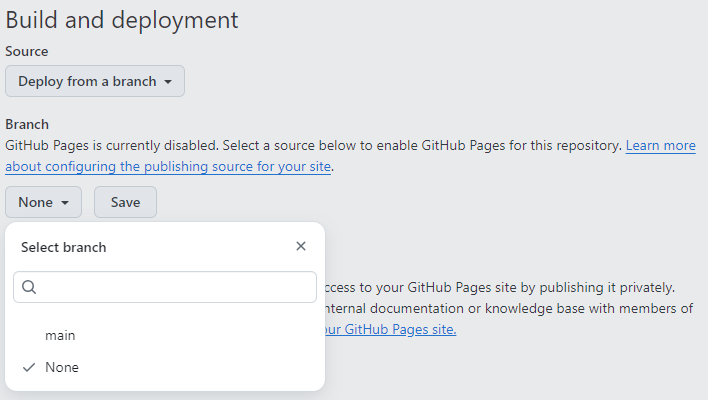
- Click Save.

- Go to the Settings tab of your repository.
Congratulations! ![]() You’ve now created a repository for your GitHub Pages site. GitHub will provide you with a URL where your site will be published (
You’ve now created a repository for your GitHub Pages site. GitHub will provide you with a URL where your site will be published (![]() usually https://username.github.io).
usually https://username.github.io).
In the next section, we’ll cover how to add content to the site and make your first commit.
Add Content and Make Your First Commit
Now that you have created your repository, it’s time to add some content to your site and make your first commit. We’ll start with a simple index.html file.
-
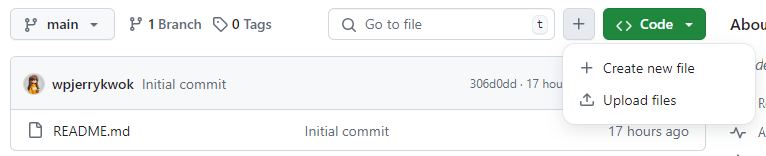
Go to your repository page on GitHub.
-
Click the + button, then select Create new file.
-
In the Name your file… field at the top, type
index.html. This will be the homepage of your site.
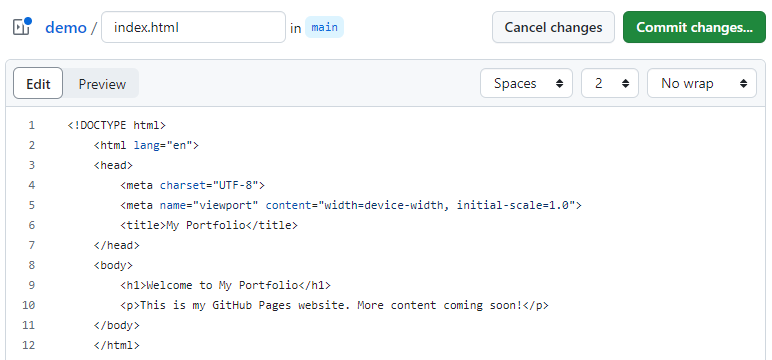
- In the edit area, add some basic HTML.
-
Here’s a simple example:
 <!DOCTYPE html>
 <html lang="en">
 <head>
    <meta charset="UTF-8">
    <meta name="viewport" content="width=device-width, initial-scale=1.0">
    <title>My Portfolio</title>
 </head>
 <body>
    <h1>Welcome to My Portfolio</h1>
    <p>This is my GitHub Pages website. More content coming soon!</p>
 </body>
 </html>
-
-
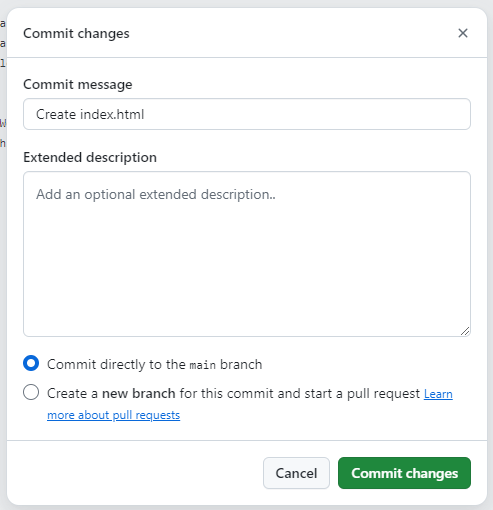
Commit the new file:
- Click “Commit changes…”.

- A commit message like Create index.html is automatically filled in.
- Leave the “Commit directly to the main branch” option selected.
- Click “Commit changes”.
- Click “Commit changes…”.
-
After committing, you’ll be taken back to your repository’s main page. An
index.htmlfile is listed in your repository files.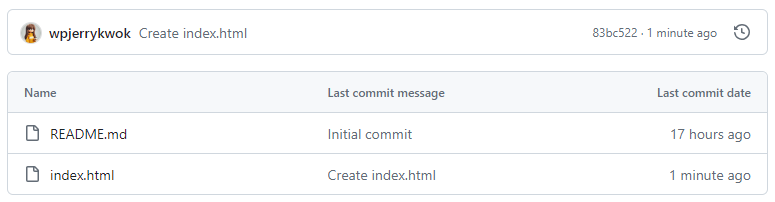
-
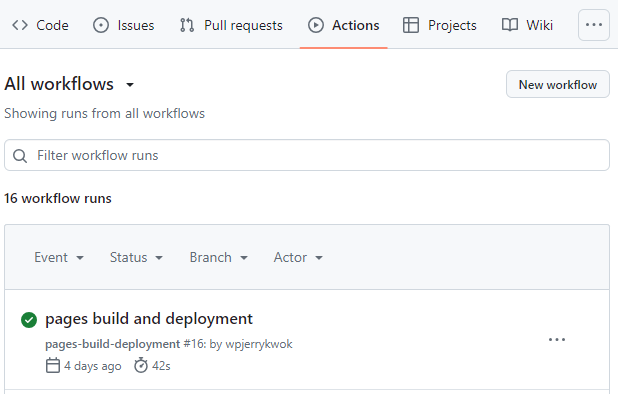
Click Actions tab. Wait for the workflow to be success (a green tick).
- Open a new tab in your browser and go to https://username.github.io (replace ‘username’ with your GitHub username). You should see your new webpage live!
![]() Congratulations!
Congratulations! ![]() You’ve just created and published your first page on GitHub Pages. This is the foundation of your portfolio website.
You’ve just created and published your first page on GitHub Pages. This is the foundation of your portfolio website.
Conclusion and Next Steps
You’ve successfully set up your basic portfolio website using GitHub Pages. Let’s recap what we’ve accomplished:
-
Created a GitHub account
-
Set up a new repository specifically for GitHub Pages
-
Added a simple index.html file as the foundation of your site
-
Made your first commit and published your site
Your portfolio is now live and accessible to anyone on the internet. While this is a great start, a basic HTML site might feel a bit limited for a full portfolio ![]() .
.
![]() This is where Jekyll comes in. Jekyll is a static site generator that works seamlessly with GitHub Pages, allowing you to create more complex and feature-rich websites without the need for server-side programming or databases.
This is where Jekyll comes in. Jekyll is a static site generator that works seamlessly with GitHub Pages, allowing you to create more complex and feature-rich websites without the need for server-side programming or databases.
In my next blog post, I will explore:
-
What Jekyll is and why it’s beneficial for portfolio sites
-
How to set up Jekyll with your existing GitHub Pages repository
-
Creating and organizing content using Jekyll’s powerful features
-
Customizing your site’s appearance with Jekyll themes
Stay tuned to take your GitHub Pages portfolio to the next level with Jekyll!